Monday 26 September 2011

Oh! What a lovely war film review


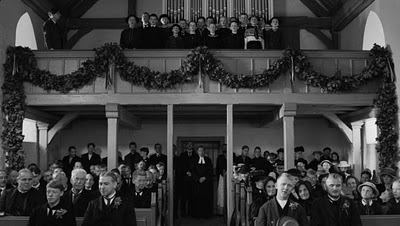
Oh! what a lovely war, directed by Richard Attenbourough is a musical film based on he 1963 stage musical which summarises the on goings of world war one using many popular songs if that time era to tell the story.

Within the opening credits there was a range of war artifacts shown on the sides of the text which gave me insight to what items they owned and used to both live and fight. This inspired me to think about how one item could have many functions for example their hats were used to protect them when in battle however it could have also been used to carry items in or even eat out of if they didn't have bowls. The items included badges and guns etc and has also influenced my research into the theme and what props I could create for my project.


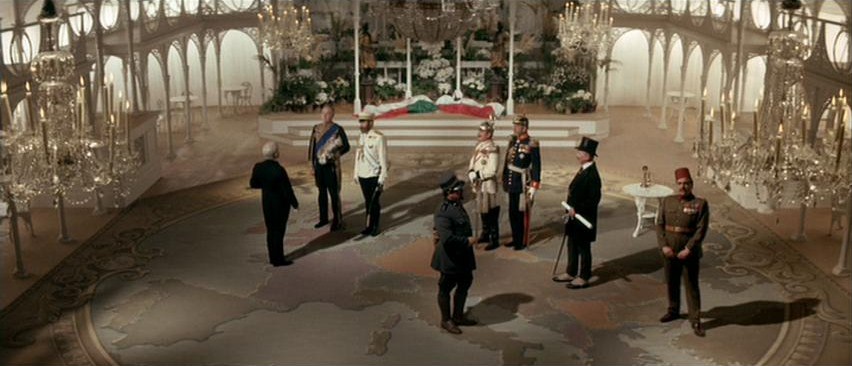
The film still sticks to its theatrical roots by using sets that look as if they have been replicated from the stage version, this was the impression I got from the opening scene with the grand white structure at the back of the shot (see image above). Also many of the shots took place in a simplified version of Brighton pier and its fun-fair giving the light-hearted look on the war that the film portrayed throughout. This is shown in the opening scene (see image above) where all  the men are standing on a large rug with the world map printed on it. Each man stood on their country and discussed if they were going to go to war or not, within the discussion they all had a carefree attitude towards such a serious event and spoke as if it was a game. This attitude continues throughout the film along with the light-hearted outlook on the war being portrayed strongly within the whole of the film.


One scene that to me worked really well and showed what the film was all about was when the soldiers and woman were all dancing around the carousel. This really highlighted the reality of war with the men galloping around the carousel acting as a metaphor for them going into battle, this again showed the how they were trying to bring a high-spirited take on the war by using a fun and exciting element to portray such a worrying moment when they all go into battle. The combination of sound effects and music was also very important within this scene as well as many others. The music moved the scenes along when there was no speech and the use of the song helped the audience connect to the characters with the clever lyrics allowing you to understand their thoughts and feelings in a more creative way pulling the audience in and making the film more enjoyable to watch. This worked well with me as I love to watch musicals and therefore this was a film I really enjoyed watching and talking about. One scene that portrayed this well was near to the end when the families were standing on the pier saying goodbye to the soldiers. At the beginning when all the families were stood together the music was up beat and jolly showing the characters happiness, which is something that the audience automatically pick up on due to the association we make between music and feelings. As the soldiers had to rush off the tempo started to increase and overall the the music sounded busy adding any instruments in all at one time before it then started to slowly decrease again pulling the shot away from the soldiers as if they were walking away. The further away they got in the shot the quieter the music got with the solid drone in the background fading into silence, focusing the camera on the faces of the families. This was one process that really drew the audience in, and was effective in my opinion as it made you connect with the characters and feel for them as you have a connection. This is due to everyone having lost someone in their life so can relate that to the situation. This was one element that made the film appealing to me and made me want to watch more as well as showing me the importance of music within a film.


The use of sound effects was used within the film to portray background situations that wernt necessary for the audience to see and also brought in the reality of the time that was hidden behind the light hearted exterior they show in the film. Within the carousel scene the sound effect of gun shots were used to move away from the jolly song and link into the next shot where you see all of the dead bodies where the soldiers had been killed. The sound effects are the only thing that signifies the killing of the soldiers due to only seeing the before and after shots, this is used throughout the film and if extremely effective as at no point did I feel that you needed to see the action in the middle and you could link the sound effects and the shots together yourself to create a clear image in your head as to what would have happened which meant that the film was not dragging on. The use of red poppy's (see image above) to signify trouble or death was also a technique that appeared throughout and all you saw were still shots focusing on the flowers, leaving the audience to connect that to the death in the same way as the link between the sound effects and the action it was portraying.


The use of costume within the film is one element that always draws me in as I am so interested into that part of any film. From this film I was able to see how they changed the costumes to fit in with the emotions of the characters. At the beginning of the film there was a lot of pastel colours within the everyday clothing however as the film went on the costumes became darker which reflected the emotions of the characters, as they realised the reality of war and came to terms with loosing people in their life. The every day clothing also also showed the difference in class within the area as you could see the range in the colours they wore as well as the materials their costumes were made out of. This is one factor that wasn't so obvious in many of the black and white films as you could only go by the different shades of colour.

Finally the way they switched from scenes in the fun-fair to those based on the war was very clever and made the film flow a lot more than if they had just used static shots. To create this fluidity they used props that you would find in both the fun-fair and the war, for example they stared off by a shooting range stool at the fair  then as the gun was lifted and the camera angle was changed the gun was now part of a army shooting practice. This connected both sides of the film together through out as well as giving the film a good balance between the focus on war and life back home. It also allowed me to compare the two and expand my research into home life as there was alot I could refer back to.


Overall this was a film I really enjoyed watching and has helped with many aspects of my research, and developed ideas into what props I could produce.

Wednesday 21 September 2011

The White Ribbon film review


The White Ribbon is a film by Michael Haneke (2009), based in a small German village within the period just before WW1. The film follows the unusual events that had been occurring within the village, Haneke said that he based the film on the origins of terrorism, however after watching the film I thought that it was based around the children of the time and how they were treated.
 The film was shot in a way that I was particularly affected by with the use of long static shots and the  real time that created tension and made the audience feel uncomfortable throughout the film. This also made the audience feel for the characters and made them wonder what was going to happen next. It was the way that the film was shot along with the use of set and costume to portray a rang of messages to the audience that made the film interesting for me rather than the storyline itself.

      
The way in which black and white was used within the film was extremely effective and just by using the two colours and many tones within the two, the film was able to portray several important details within that period of time that I feel would not have been portrayed in the way if colour was used. The strong contrast of colour used throughout the film heightened the reality between the social classes of the time, the wealthier you were the more tones of the colours there was within your clothes eg. The pastor and his children wore white and many tones combined in their clothes whereas the nanny just wore a plain black dress suggesting she had less money and was of a lower class to the pastors family. Also the way in which they used the colour white to symbolise innocence through out the film worked well, from tying a ribbon in the hair of one of the girls when she needed reminding of how she needed to behave to most the children having it within their clothing. 
The use of Set and space also highlighted the difference in lifestyle within the time period. The poorer houses were small, made with mainly wood and were very plain, with wallpaper in some rooms however it was peeling off the walls with little light due to the small windows. In contrast to this the richer families housing had more decoration with pictures on the walls along with lavish furniture, a lot more space and light as there was larger windows that didn't have wooden shutters blocking the light. The space within the rooms also helped show the contrast in wealth with the richer having more of the room visible within the frames whereas the poorer people were squashed into them and there was little space shown around them.


The scenes that show the characters working created a sense of  realism as it showed how different it was to work then too what it is like now, with a clear divide between men and women. This was shown in the scene where the frail woman was sent upstairs to do the lighter work and fell through the rotten wood. This gave the massage to me that the men didn't think she was capable of doing the jobs they were doing, therefore they thought they were better and stronger than she was. Also the scene where you see the children having to help with the hay in the fields (see image above), showed that at that point in time it didn't matter what age you were you were forced to work to provide income for your family, even if it was dangerous and could harm you. This is something that you wouldn't see today and shows how times have changed and respect for different genders and classes has grown.


The one thing that I really liked about the film and think was the most effective method was the way in which the film made you come to your own conclusions on some of the events , leaving you questioning parts of the film as it didn't give everything away in the storyline or shots. One way in which this was done was by shooting scenes behind closed doors or in dark corridors so you couldn't see a lot or sometimes nothing so you had to interrupt what was actually going on in that scene. The one scene in particular was when the little boy walked in on the doctor sexually abusing his daughter late at night (see image above). Nothing was said about the situation but from the emotions and movements, such as her pulling her night gown down showed that the story about piercing her ears they were telling the little boy was just a cover up for the abuse she was going through at that moment. This scene also effected me as it felt like she was obviously scared of her father and what punishment she would have to go through if she told someone, therefore she helped him with the cover up story so that no one found out what he was doing. Through out the film there was also no soundtrack, with the only music heard coming from the characters playing musical instruments, giving a sense of realism again and meant the audience couldn't rely on that to work out the moods and emotions being portrayed. Therefore again it was left up to the audience to work it out themselves. This is one thing that I picked up on through out the film and felt that the whole story line relied on the audience working out the answers to a lot of situations. 


Tuesday 20 September 2011

How to vacuum form: An WW1 helmet

From the research found on WW1 helmets Andy was able to use the measurements found to scale up a replicate template of an helmet to help us create our own. This will go towards the props section of our project as well as helping expand the skills we already have.

Creating the Mould:

1.      From the research, the measurements and shape need to be transferred onto a plain piece of paper, so that it is the correct scale and can act as a template.

2.      This paper template then needs to be stuck onto a thin piece of styrene, marking the centre point of the helmet.

3.      Once stuck onto the plastic half of the image needs to be cut away, leaving the other half of the template attached to the large piece of the plastic.
4.      Cut the remaining half away leaving the outline of the helmet on the plastic, allowing you to cut straight lines around the shape leaving a border. This will now create your plastic template which will be strong enough to create the plaster mould.

5.      Sand down the edge of the template so that you have a smooth edge to create the mould with.

6.      Using the template, attach the centre to a wooden pole so that the bottom of the pole is equal to the bottom of the template. To create the bond between the two materials use super glue and an agent, this allows the bond to be created a lot quicker allowing you to continue with the process.

7.      Next drill a hole into a small block of wood, big enough to fit the pole with the template attached inside. There also needs there to be enough room for the pole to be moved around. Then using a PVA glue and super glue combination the block of wood needs to be stuck to a wooden board. ( The PVA provides the strength however the super glue allows it to set a lot quicker)

8.      Coat the board and block with a couple of layers of a sealing agent, therefore when the plaster is placed onto the wooden board it will not absorb the moisture.

9.      Place the pole and template combination into the hole drilled in the wooden block, ready to start producing the mould. ( Vaseline can be placed in the hole to assist the rotation of the pole)

10.  Start placing the plaster in a bowl of water, the warmer the water the quicker the reaction will take place. When islands of plaster start to from on top of the water that indicates to stop adding plaster and to start mixing the two together using your hands until the mixture thickens.

11.  Place the plaster into the centre of the board, working your way outwards. Make sure that the template is being rotated regularly so that the shape of the helmet starts to be created.

12.  Keep repeating the last step, building up the layers of plaster until the complete helmet shape is created. Remove the pole from the centre of the mould and patch up the top. This mould can now be used as the template to create the vacuum formed piece.


Vacuum forming the helmet:

1.      Cut a piece of styrene to 27cm ², ready to use on the vacuum forming machine.

2.      Place the plaster mould onto the table of the vacuum form machine; spay the mould with wax so the plastic doesn’t stick then lower the table.

3.      Place the piece of plastic onto the border of the table, shiny side up, clamping it into place.

4.      Pull the heater over the plastic and watch until waves are created and then start to clear at this point you know the plastic is ready to be vacuum formed.

5.      Push the heater back and pull the leaver forward to move the table up, pressing the start button straight after allowing the shape needed to be created.

6.      Wait until the plastic is cool before you un-clamp the plastic and separate it from the plaster mould. ( When you can’t create marks with your finger nail or corner of an object, the plastic is cool enough)

7.      Cut around the base of the helmet mould, so that the excess plastic is removed leaving you with the desired shape and your WW1 helmet.